Ever experience bad hard drive, read error or "operating system not found" error when powering up your computer, or even worse your laptop. Thought of changing the hard drive yourself, or a simple capacity upgrade that you can do yourself at home (of course after your warranty expires).
Find your hard drive compartment (usually at the bottom ~ of the laptop)
Remove all screws from the hard drive cover and remove the cover itself. You'll see some sort of image below (well, a little bit different maybe). Find your way to remove the hard drive by looking at the drive itself and a little thinking and tinkering. Usually, you'll do this step before buying a replacement drive as you'l need to confirm the connection interface whether it's IDE or SATA. If the connectors look like the drive in this post, it's IDE, if it's smaller by a large margin then probably it's SATA.
Prepare your new hard drive (in this case, it's IDE)
To simplify formating / partitioning you drive, connect your drive to external usb casing connector and connect the drive to another PC or laptop.
I prepare the drive using "Disk Management" tools inside "Control Panel > Administrative Tools > Computer Management > Storage". Create your prefered volume size and partition by using "New Simple Volume Wizard".
Make sure one partition is set active to make sure it'll boot from there. After preparing all your partition, install your favourite operating system as usual.
Tuesday, August 12, 2008
Wednesday, July 30, 2008
Defragment your drive - the quick way
Tired of slow hard disk file operation, your computer become slower and slower after each restart. Maybe your files are fragmented here and there. Sometimes, a big file of a few hundred megabyte will be separated to hundreds or even thousands fragments. This will easily make your file operation slower.
Usually every computer will come with a standard defragmenting tools, but using one is quite time consuming and not very user friendly. This will lead to "I'll do it later" habit which will worsen the fragmentation level of the drive.
Wait no more... after installing Auslogics Disk Defrag, the whole defragmentation process was a breeze, just select the drive :
Click next and watch the whole process or leave it on it's own.
After that, just click finish and voila!, it's done.
And best of all, it's free.
For the latest version, please visit their website at http://www.auslogics.com/
Download page at http://www.auslogics.com/en/software/disk-defrag/download
Labels:
Defragmentation,
Free,
Hard Disk
Tuesday, July 22, 2008
Fried RAM Connector
While readying for a drag race (I mean on a PC game), suddenly my PC stop responding and the screen froze. Nothing left to do, I hit the reset button, after the Nvidia BIOS post, the screen froze again while displaying RAM size.
I repeat the process several times but the outcome still same. Suspecting that my RAM is the culprit, I opened the case and find my RAM had it connector fried. Firstly the fried connecter become black (burned), then after few scratch and patch, loose a few layers of PCB, to no avail.
Time to do some RAM shopping again I guess.
I repeat the process several times but the outcome still same. Suspecting that my RAM is the culprit, I opened the case and find my RAM had it connector fried. Firstly the fried connecter become black (burned), then after few scratch and patch, loose a few layers of PCB, to no avail.
Quite a frustrating shot though....
So I decided to run my PC using half the amount of RAM as usual, you know......with Vista... and Aero thingy, my PC become sluggish. But to my surprise, it still run games flawless albeit a bit slow on loading.
Time to do some RAM shopping again I guess.
Sunday, July 13, 2008
Tips on buying an USB Flash Drive
Recently, the are numerous brands and capacity of USB Flash Drive in the market. To find one that is suitable for you maybe quite difficult. Factors such as price, capacity, design, colour, brands will probably let your buying decision difficult.
But one factor that you'll always left behind is speed, and it's a very important factor should be taken into consideration. The factor is SPEED. Many advertisement says USB2.0, 480mbit/s and so on, so how can you actually simply check the speed before buying one.
This is what I do, I will bring my laptop with Vista in it, plug in the USB Flash Drive, then an option (Autoplay) will appear. Scroll down until you see "Speed up my system using Readyboost" then click once, some speed testing will follow, if it passed the test, then you can consider buying it. If not, try other brands.
During my last shopping, 2 of 4 drive that I've tested failed Readyboost speed test. So...be wise, the choice is yours.
Labels:
Readyboost,
USB Flash Drive
Wednesday, July 9, 2008
Rare breed?
Friday, June 27, 2008
Tips on locking 3d speed of 7150M on Vista
Many of us using this 3d chipset on Vista have problem of setting or locking it's speed, it'll revert to low 2d mode of 100mhz and causing sluggishness especially when using vista aero theme.
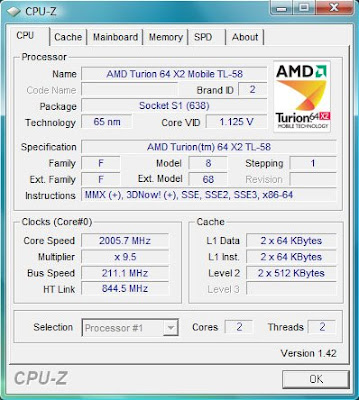
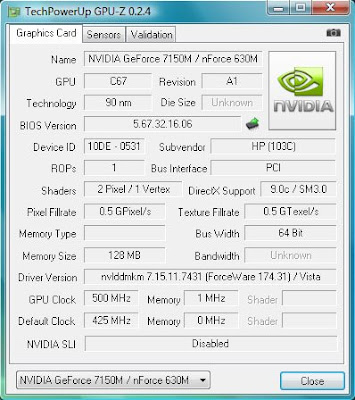
Well, I think that I have a simple solution to this, first .... lets have a look at my screenshot below :
My CPU
And now GPU
The steps :
Well, I think that I have a simple solution to this, first .... lets have a look at my screenshot below :
My CPU
And now GPU
The steps :
- Download NTune
- Apply coolbits (allow overclocking)
- Adjust your reference clock under performance / adjust motherboard settings (I set at 211mhz), GPU and other settings will automatically set.
- Tweak your memory timings (the lower the better)
- Save your profile
- Under performance / adjust custom rules, set 'Load this (your profile) WHEN CPU is active (performance) for 10 second, so that it will lock your speed like mine (the software think that cpu is always active).
- Good luck and restart.
Note : may be driver dependant, I've been using 174.31 driver to achieve this, other version that I've tried had not been able to hold the locks in every start of the laptop.
Labels:
3d,
7150M,
geforce,
nvidia,
powermizer,
V3000,
V3614au,
vista aero
Thursday, June 26, 2008
Just started
Hello everyone, welcome to my blog space, just watchout for this space as I will update it with latest info on UIQ, my photos, overclocking, cars and many more. Thanks for dropping by.
Labels:
First Post,
Photo
Subscribe to:
Posts (Atom)